
今回は、JavaScriptを使ってカレンダーを一から実装する方法を解説します。
カレンダーを作る過程で、Dateオブジェクトの扱い方、日付計算のロジック、動的なHTML生成など、多くのことを学びました。特にDateオブジェクトのメソッドには癖があり、最初は戸惑うことが多かったです。
この記事では、カレンダー実装の基本から、私が実際につまずいたポイントまで詳しく解説します。
完成イメージ
まず、作るカレンダーの完成形を見てみましょう。
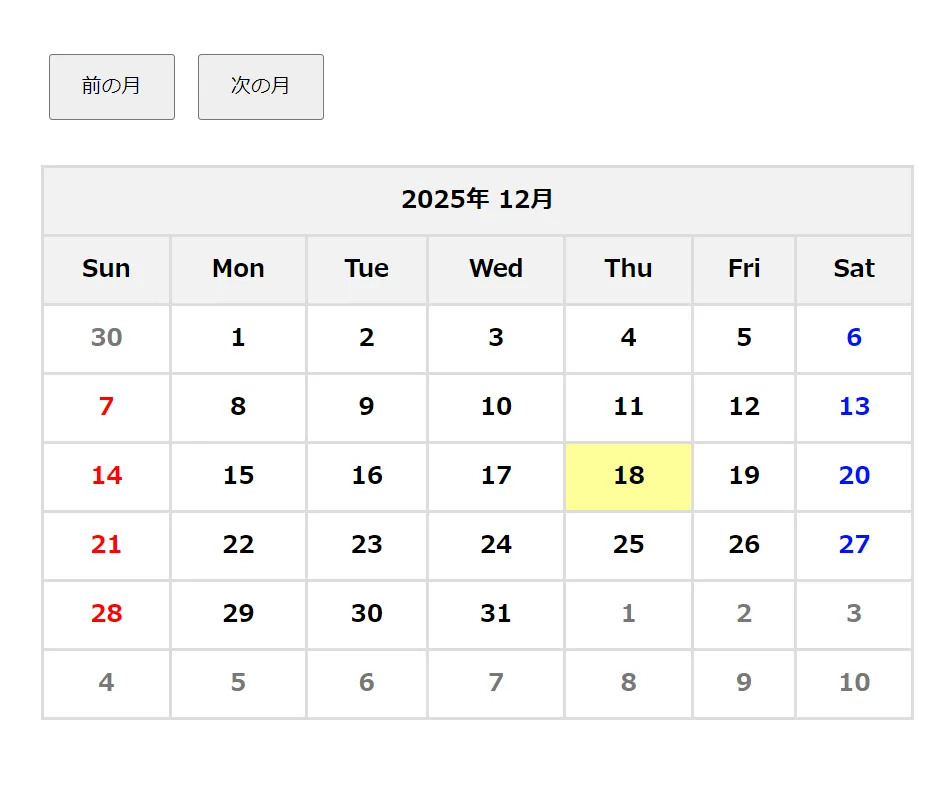
月単位でカレンダーを表示し、前月・次月への移動ができます。今日の日付はハイライト表示されます。
Dateオブジェクトの基礎
カレンダーを作る前に、JavaScriptのDateオブジェクトについて理解する必要があります。
Dateオブジェクトとは
Dateオブジェクトは、JavaScriptで日付や時刻を扱うためのオブジェクトです。
// 現在の日時
let now = new Date();
console.log(now);  // Mon Dec 15 2024 10:30:00 GMT+0900

// 特定の日付
let someDay = new Date(2024, 11, 15);  // 2024年12月15日
重要なメソッド
カレンダー実装に必要な主なメソッドを紹介します。
getFullYear()
指定された日時の年に相当する絶対的な値を返します。
let date = new Date(2024, 11, 15);
console.log(date.getFullYear());  // 2024
getMonth()
getMonth()は指定された日時の月を返します。0からスタートするため、1月は0になることに注意が必要です。
let date = new Date(2024, 0, 15);  // 2024年1月15日
console.log(date.getMonth());  // 0(1月)

let date2 = new Date(2024, 11, 15);  // 2024年12月15日
console.log(date2.getMonth());  // 11(12月)
最初、これを知らなくて1ヶ月ズレたカレンダーができてしまいました。月を扱うときは常に「実際の月 – 1」を意識する必要があります。
getDate()
getDate()1から31までの日付を返します。月の何日目かを取得するメソッドです。
let date = new Date(2024, 11, 15);
console.log(date.getDate());  // 15
getDay()
getDay()は指定した日時の曜日に対応した数値を返します。日曜日は0からスタートします。
let date = new Date(2024, 11, 1);  // 2024年12月1日(日曜日)
console.log(date.getDay());  // 0(日曜日)

// 曜日の対応
// 0 = 日曜日
// 1 = 月曜日
// 2 = 火曜日
// 3 = 水曜日
// 4 = 木曜日
// 5 = 金曜日
// 6 = 土曜日
カレンダー実装に必要な情報の計算
カレンダーを生成するには、以下の4つの情報が必要です。これらは全て generateCalendar() 関数の冒頭で計算しています。
// 必要な情報を計算
const startDay = new Date(year, month - 1, 1).getDay();          // 月の最初の曜日
const endDate = new Date(year, month, 0).getDate();              // 月の日数
const today = new Date();                                         // 今日の日付
const lastMonthEndDate = new Date(year, month - 1, 0).getDate(); // 前月の最終日
1. 月の最初の曜日 (startDay)
その月の1日が何曜日から始まるかを知る必要があります。これによって、カレンダーの最初の行をどこから埋めるかが決まります。
let startDay = new Date(year, month - 1, 1).getDay();
// 例: 2024年12月1日 → 0(日曜日)
2. 月の日数 (endDate)
その月が何日まであるかを知る必要があります。ここで使っているのが、Dateオブジェクトのトリックです。new Date(2024, 12, 0) は「2024年12月の0日」、つまり「2024年11月の最終日」を意味します。
let endDate = new Date(year, month, 0).getDate();
// 例: new Date(2024, 12, 0) → 2024年12月31日 → 31
このように、日付に0を指定することで前月の最終日を取得できます。最初、この書き方を見たときは「なぜ12月なのに13月?」と混乱しました。仕組みとしては、month + 1 の月を指定して、日を 0 にすることで、その前月の最終日が取得できるということです。
3. 前月の最終日 (lastMonthEndDate)
カレンダーの余白を埋めるために、前月の最終日も必要です。
let lastMonthEndDate = new Date(year, month - 1, 0).getDate();
// 例: new Date(2024, 11, 0) → 2024年11月30日 → 30
4. 今日の日付 (today)
今日の日付をハイライト表示するために使います。
let today = new Date();
カレンダー生成の完全なコード
まず、完全なコードを見てから、各部分を詳しく解説します。
HTML
<!DOCTYPE html>
<html lang="ja">
<head>
    <meta charset="UTF-8">
    <title>カレンダー</title>
    <link rel="stylesheet" href="style.css">
</head>
<body>
    <div class="calendar-container">
        <button id="prevMonth">前の月</button>
        <button id="nextMonth">次の月</button>
        <div id="calendar"></div>
    </div>
    <script src="script.js"></script>
</body>
</html>
CSS (style.css)
.calendar-container {
    max-width: 800px;
    margin: 0 auto;
    padding: 20px;
}

button {
    padding: 10px 20px;
    margin: 10px 5px;
    cursor: pointer;
}

table {
    width: 100%;
    border-collapse: collapse;
    font-weight: bold;
    margin-top: 20px;
}

td, th {
    border: 2px solid #ddd;
    padding: 10px;
    text-align: center;
}

th {
    background-color: #f2f2f2;
}

/* 日曜日(最初の列)*/
td:first-child {
    color: #ff0000;
}

/* 土曜日(最後の列)*/
td:last-child {
    color: #0011ff;
}

/* 無効な日付(前月・次月)*/
td.is-disabled {
    color: #787878;
}

/* 今日の日付 */
td.is-today {
    background-color: #ffff99;
}
JavaScript (script.js)
// 現在の年月を取得
let year = new Date().getFullYear();
let month = new Date().getMonth() + 1;

// カレンダーを生成する関数
function generateCalendar(year, month) {
    // 必要な情報を計算
    const startDay = new Date(year, month - 1, 1).getDay();
    const endDate = new Date(year, month, 0).getDate();
    const today = new Date();
    const lastMonthEndDate = new Date(year, month - 1, 0).getDate();

    let dayCount = 1;
    let calendarHtml = '<table>';

    // タイトル行
    calendarHtml += `<tr><th colspan="7">${year}年 ${month}月</th></tr>`;

    // 曜日ヘッダー
    calendarHtml += '<tr>';
    const weeks = ['Sun', 'Mon', 'Tue', 'Wed', 'Thu', 'Fri', 'Sat'];
    for (let i = 0; i < weeks.length; i++) {
        calendarHtml += `<th>${weeks[i]}</th>`;
    }
    calendarHtml += '</tr>';

    // カレンダー本体(6週分)
    for (let i = 0; i < 6; i++) {
        calendarHtml += '<tr>';
        for (let j = 0; j < 7; j++) {
            if (i === 0 && j < startDay) {
                // パターン1: 前月の余白
                let num = lastMonthEndDate - startDay + j + 1;
                calendarHtml += `<td class="is-disabled">${num}</td>`;
            } else if (dayCount > endDate) {
                // パターン2: 次月の余白
                let num = dayCount - endDate;
                calendarHtml += `<td class="is-disabled">${num}</td>`;
                dayCount++;
            } else {
                // パターン3: 当月の日付
                const isToday = (year === today.getFullYear() &&
                                 month === (today.getMonth() + 1) &&
                                 dayCount === today.getDate());

                let classNames = isToday ? 'is-today' : '';
                calendarHtml += `<td class="${classNames}">${dayCount}</td>`;
                dayCount++;
            }
        }
        calendarHtml += '</tr>';
    }

    calendarHtml += '</table>';

    // DOMに挿入
    document.getElementById('calendar').innerHTML = calendarHtml;
}

// 初期表示
generateCalendar(year, month);

// 前月ボタン
document.getElementById('prevMonth').addEventListener('click', () => {
    month--;
    if (month < 1) {
        month = 12;
        year--;
    }
    generateCalendar(year, month);
});

// 次月ボタン
document.getElementById('nextMonth').addEventListener('click', () => {
    month++;
    if (month > 12) {
        month = 1;
        year++;
    }
    generateCalendar(year, month);
});
コードの詳細解説
それでは、各部分を詳しく見ていきましょう。
カレンダー生成のロジック
カレンダーを生成する generateCalendar() 関数が、このコードの核心部分です。
3パターンのセル生成の解説
カレンダーの各セルは、完全なコードの中で3つのパターンに分かれて処理されています。
// カレンダー本体(6週分)
for (let i = 0; i < 6; i++) {
    calendarHtml += '<tr>';
    for (let j = 0; j < 7; j++) {
        if (i === 0 && j < startDay) {
            // パターン1: 前月の余白
        } else if (dayCount > endDate) {
            // パターン2: 次月の余白
        } else {
            // パターン3: 当月の日付
        }
    }
    calendarHtml += '</tr>';
}
パターン1: 前月の余白
月の最初の曜日より前のセルには、前月の日付を薄く表示します。
if (i === 0 && j < startDay) {
    // 1行目で、月の開始曜日より前
    let num = lastMonthEndDate - startDay + j + 1;
    calendarHtml += `<td class="is-disabled">${num}</td>`;
}
この計算式が最初は全く理解できませんでした。例えば、12月1日が水曜日(startDay = 3)、11月が30日までの場合を考えてみます。
日曜(j=0)の計算: 30 - 3 + 0 + 1 = 28
月曜(j=1)の計算: 30 - 3 + 1 + 1 = 29
火曜(j=2)の計算: 30 - 3 + 2 + 1 = 30

結果:
日 月 火 水 木 金 土
28 29 30  1  2  3  4
前月(11月)の最終日が30日なので、28、29、30が正しく表示されます。
パターン2: 次月の余白
月の日数を超えた後のセルには、次月の日付を薄く表示します。
else if (dayCount > endDate) {
    // 月の日数を超えた
    let num = dayCount - endDate;
    calendarHtml += `<td class="is-disabled">${num}</td>`;
    dayCount++;
}
例えば、12月は31日までなので、32日目のセルには次月(1月)の1日が表示されます。
パターン3: 当月の日付
実際の当月の日付を表示します。今日の日付は特別なクラスを付けます。
else {
    // 今日かどうか判定
    const isToday = (year === today.getFullYear() &&
                     month === (today.getMonth() + 1) &&
                     dayCount === today.getDate());

    let classNames = isToday ? 'is-today' : '';

    calendarHtml += `<td class="${classNames}">${dayCount}</td>`;
    dayCount++;
}
前月・次月の移動
カレンダーに前月・次月ボタンを追加して、月を切り替えられるようにします。
HTML
<button id="prevMonth">前の月</button>
<button id="nextMonth">次の月</button>
<div id="calendar"></div>
JavaScript
let year = new Date().getFullYear();
let month = new Date().getMonth() + 1;

// 初期表示
generateCalendar(year, month);

// 前月ボタン
document.getElementById('prevMonth').addEventListener('click', () => {
    month--;
    if (month < 1) {
        month = 12;
        year--;
    }
    generateCalendar(year, month);
});

// 次月ボタン
document.getElementById('nextMonth').addEventListener('click', () => {
    month++;
    if (month > 12) {
        month = 1;
        year++;
    }
    generateCalendar(year, month);
});
ポイントは、1月から前月に行くと12月(前年)に、12月から次月に行くと1月(翌年)になるように制御することです。
// 1月 → 前月 → 12月(前年)
year = 2024, month = 1
↓ 前月ボタン
month = 0 → month = 12, year = 2023

// 12月 → 次月 → 1月(翌年)
year = 2024, month = 12
↓ 次月ボタン
month = 13 → month = 1, year = 2025
CSSでのスタイリング
カレンダーに見た目を整えるCSSを追加します。
基本的なスタイル
table {
    width: 100%;
    border-collapse: collapse;
    font-weight: bold;
}

td, th {
    border: 2px solid #ddd;
    padding: 10px;
    text-align: center;
}

th {
    background-color: #f2f2f2;
}
曜日ごとの色分け
/* 日曜日(最初の列)*/
td:first-child {
    color: #ff0000;
}

/* 土曜日(最後の列)*/
td:last-child {
    color: #0011ff;
}
無効な日付(前月・次月)
td.is-disabled {
    color: #787878;
}
今日の日付
td.is-today {
    background-color: #ffff99;
}
つまずいたポイント
1. 月が0から始まる
Dateオブジェクトの月は0から始まるため、常に実際の月より1小さい値を指定する必要があります。
// ❌ 間違い
let month = 12;  // 12月のつもり
new Date(2024, 12, 1)  // → 2025年1月1日になる

// ✅ 正解
let month = 12;  // 12月
new Date(2024, month - 1, 1)  // → 2024年12月1日
最初、これに気づかずに1ヶ月ズレたカレンダーができて、何度もデバッグしました。
2. 前月の日付計算
前月の余白の日付を計算する式が、最初は全く理解できませんでした。
let num = lastMonthEndDate - startDay + j + 1;
この式を理解するには、実際に数値を当てはめて何度も計算してみることが必要でした。紙に書いて確認したことで、ようやく理解できました。
3. getDate()とgetDay()の混同
getDate() は日付(1-31)を返し、getDay() は曜日(0-6)を返します。似た名前なので、最初はよく混同していました。
let date = new Date(2024, 11, 15);

date.getDate();  // 15(日付)
date.getDay();   // 0(日曜日)
4. 月末日の取得方法
月の日数を取得する new Date(year, month, 0) のトリックが、最初は理解できませんでした。「なぜ次の月を指定するのか」「なぜ0日なのか」が分からず、調べるまで時間がかかりました。
// 2024年12月は何日まで?
let endDate = new Date(2024, 12, 0).getDate();
// → new Date(2024, 12, 0) = 2024年12月の0日 = 2024年11月の最終日
まとめ
今回、カレンダーを実装して学んだポイントです。
JavaScriptのDateオブジェクトには独特な癖があります。特に月が0から始まることは、常に意識する必要があります。また、日付に0を指定することで前月の最終日を取得できるトリックは、カレンダー実装では必須のテクニックです。
カレンダー生成のロジックは、3パターンのセルを正しく処理することが重要です。前月の余白、当月の日付、次月の余白をそれぞれ適切に計算して表示する必要があります。
前月の日付計算の式は複雑に見えますが、実際に数値を当てはめて計算してみることで理解できます。分からないときは、紙に書いて確認するのが一番です。
Dateオブジェクトの主要メソッドを理解すれば、カレンダー以外にも様々な日付処理ができるようになります。getFullYear()で年、getMonth()で月(0始まり)、getDate()で日、getDay()で曜日(日曜が0)を取得できることを覚えておきましょう。


コメント